

Let The Good Times Roll
By: Sarah
It’s my cinnamon roll kind of day, y’all! I meant am craving for those big, fluffy, mouth-watering, tall, tender, cinnamony, moderately sweet cinnabuns with a generous amount of cream cheese frosting. The kind we see selling in malls, that outrageously overpriced (and that classic flavor and fresh-baked goodness seemed discontinued and now just taste okay) buns make me skip the line. To me, it’s now just bread with cinnamon flavors, that’s it, it’s a downgrade, it’s a dry bun, it’s a reheated roll, it’s no longer my favorite, they’re not that good anymore, just tastes different. But I love a good cinnamon roll, this time I opt for a homemade cinnamon roll and making them is as easy as buying them.
So what’s my kind of cinnamon roll from scratch? Pillowy soft, fluffy, perfectly chewy with a hint of gooey, jam-packed with cinnamon flavors, and slathered in a decadent cream cheese frosting. And yes, the only thing better than a cinnamon roll is a giant cinnamon roll that’s double the size of regular rolls, oversized, let me repeat that, like the size of your hand. The kind that I love to sink my teeth into on Sunday mornings. Let’s have fun baking cinnamon rolls today and it’s beginner easy, it’s not as difficult as you think. It’s an enriched dough with butter, milk and eggs — so it’s easy to handle. No, don’t buy that one can of dough, please.
Here are some reasons why homemade cinnamon rolls win every time. It’s homemade, you bake at home, no shortcuts, no skimping on the good stuff, no artificial flavors. It goes from oven to plate in less than an hour. And that rewards your efforts with experiencing that warmth, softness and gooey centers of freshly baked cinnamon roll. You spend less money per roll (now cinnamon rolls are priced at $7.00 per roll). Our recent trip to Las Vegas: we ordered 2 Cinnabons and 2 coffee and paid $ 32, that’s just insane. Plus baking is always therapeutic, you are completely hands-on with mixing dough, kneading, rolling, filling, slicing, baking and then seeing the dough rising beautifully, success, yeah, it’s Hallelujah. And that sweet scent of cinnamon and warm dough wafts through the air, it’s just magical, it’s simply irresistible. Once you make them once, you’ll say “why didn’t I do this sooner? Done it once, and you’ll be a pro. Yes, mistakes we can make, uneven rolls, loose spirals, a bit messy, no worries, the warm, gooey rolls straight from the oven will always taste delicious.
Beginner/Better-Than-The-Mall Cinnamon Rolls — 1-Kilo Batch
This dough uses 50/50 bread flour and all purpose flour and makes two 9 x 13 pans or to be sure to retain the shapes I place in roll in ensaimada
molders. About 15 giant rolls to enjoy and share. Let’s use a stand mixer this time.
PILLOWY DOUGH:
4 cups (500 grams) bread flour
4 cups (500 grams) all-purpose flour (I add additional 1/4 cup for to achieve
soft and elastic dough)
1 cup (200 grams) sugar
5 tablespoons milk powder
2 tablespoons (20 grams) instant yeast (Saf gold brand I use, better with enriched doughs)
1 teaspoon baking powder
2 teaspoons salt
4 large eggs
14 tablespoons (200 grams) unsalted butter, softened (tablespoons
measures displayed in wrapper)
2 cups full cream milk, warm
2 tablespoons sweetened
condensed milk
1/2 teaspoon vanilla extract
CINNAMON SWIRL FILLING:
1 cup unsalted butter (2 sticks)
2 cups light brown sugar, packed
2 tablespoons cornstarch
3 tablespoons ground cinnamon
(go for it!)
HEAVY-CREAM GOOEYNESS:
1/2 cup heavy cream or
coffee creamer
THE “GLORY” CREAM CHEESE FROSTING:
1 cup cream cheese
1/2 cup unsalted butter (1 stick)
2 3/4 cup powdered sugar, sifted
1/2 tablespoon vanilla
pinch salt
some heavy cream or coffee creamer to adjust consistency
Instructions:
1. Wake the Yeast: In a glass bowl, whisk together warm milk, yeast and a spoonful of the measured sugar. Let it sit for 5 minutes until it looks foamy, it’s active, it’s ready to work its magic.
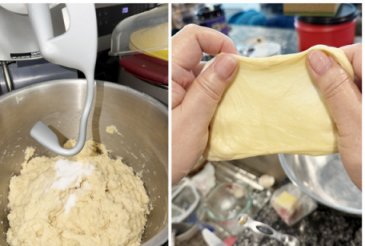
2. Build the Dough: Use paddle attachment to stir in the dry ingredients except salt in the stand mixer bowl with the wet ingredients. Dough will be shaggy.
Cover and rest for 30 minutes. Knead on low, slowly increasing to medium speed, and adding salt and butter. Knead until the dough pulls away from the sides of bowl, is smooth and elastic and achieve the window pane test.
3. The First Rise: Transfer the dough to a greased bowl, cover with cling wrap or warm towel, let it rise (fermentation stage) in a warm place for 45 minutes or until it has doubled in size. My oven had Proof function.
4. The Roll-Out: Punch the dough down to release the air. Butter or oil working surface, roll it out into a large rectangle, no need to measure, aim for thicker than a
coin, thin enough to roll tightly and thick enough to not tear. About 1/4 inch thick. Spread the softened butter onto the surface of the dough evenly. Then sprinkle the sugar/cornstarch/cinnamon mixture over the butter evenly leaving one edge free from sugar. This will be the edge you use to seal the roll. Pat with your hands to press the sugar into the butter.
5. Roll and Slice: Roll up the dough, tightly, starting from the long side. As you roll, use your hands to smooth out the dough from the center, to make the rolls even and keeping the same thickness. Use a very sharp knife, cut the dough into slices. My no-measure cutting rule of “3-finger” thickness ensure rolls tall enough to rise dramati- cally. Pinch the seam to seal it.
6. Second Rise and Bake: Place rolls in molders or baking pans. If using pans, have 2-finger gaps each roll and 1-finger gap between the rolls and the pan wall, this ensures each roll has its own “bubble of space” and room to rise. (You can refrigerate the rolls overnight and bake in the morning. Just allow the rolls to come to
room temperature before baking.) Let rise, covered, for 30 minutes only. Pour or drizzle heavy cream or coffee creamer slowly on rolls before baking, pour around the edges first, then lightly over the top (don’t drown the rolls).
Place the rolls in the preheated oven and bake at 350 F (I use convection oven) for 30-40 minutes or until they are golden brown.
7. The Finishing Touch: Add the cream cheese to bowl. Whip on high speed until smooth. Add in rest of the ingredients, mixing until smooth. Add enough creamer or heavy cream until you reach the desired consistency. Lather a thin layer of frosting on rolls that have cooled a bit (5 minutes after removing from oven). Scoop rest of frosting on top of rolls and spread when ready to serve. Enjoy!
Notes:
1. Baking powder is not traditional in classic cinnamon rolls, but this gives extra leavening (extra lift) to ensure fluffiness even if yeast action is a bit slow.
2. The addition of condensed milk enhances browning of the rolls and also gives that milk candy sweetness to the dough.
3. 350 F is the gold standard for baking cinnamon rolls. For smaller batch, bake 18- 20 minutes until tops are light golden, not dark.
This is only the basic recipe. Imagine experimenting with flavors like Ube Cinnamon Rolls, Halo-halo Rolls, Peach Cobbler Cinnamon Rolls and Blueberry Cinnamon Rolls. I repeat, it’s not as difficult as you think, so definitely TRY IT, DO IT!
Coffee please, am done, I just ate two cinnamon rolls. Excuse this one-time indulgence, only today! Next time I splitting one with Glenn lol! Happy summer ya’all!


